
Jetpack’s Subscriptions feature lets visitors to your site sign up to receive notifications whenever you publish new blog posts. It’s by far one of the easiest ways to set up email subscriptions, and to start and grow a new email list for your WordPress site.
Jetpack’s Subscriptions has many advantages, including:
- It’s entirely free!
- The set-up and configuration is minimal
- Subscribers can choose to receive your new posts by email immediately, daily, or in a weekly digest
- Subscribers can subscribe and unsubscribe themselves
- Emails sent nearly always arrive in the subscriber inboxes (i.e. good deliverability)
It does have some limitations worth pointing out:
- You can’t send any emails to your subscribers, only new post notifications
- There are no open or click stats
- You cannot design the emails
- It’s a pain to import subscribers
Once you reach a critical mass of content (i.e. when you have enough website/blog content to create drip campaigns or welcome emails), you should upgrade to a proper email marketing solution, such as MailPoet or MailChimp (more on this later).
In this tutorial, I’ll show you how to set up email subscriptions for your WordPress site using Jetpack. More specifically, we’ll cover how to configure email subscriptions for new posts and comment notifications, how to add email signup forms in various places, and why and when to upgrade from Jetpack.
Table of contents for Jetpack’s Subscriptions
- Jetpack email subscriptions in a nutshell
- How to configure Jetpack email subscriptions in WordPress
- How to set up Jetpack comment notification emails in WordPress
- How to add Jetpack subscription signup form to WordPress
- How to manage your email subscribers in Jetpack
- Subscriber preferences offered by Jetpack
- Limitations of Jetpack as a newsletter plugin
- Free alternatives to Jetpack email subscriptions
- Summary
Sound good? Let’s get started.
Jetpack email subscriptions in a nutshell

There are two types of emails sent by Jetpack’s Subscription feature:
- New post notification emails: People who subscribe to your blog will get an email every time you publish a new post. This is also known as Jetpack’s “site subscriptions.”
- Comment notification emails: Visitors who comment on posts can opt-in to receive comment notification emails to know if other visitors have commented. This is regardless of whether the user is subscribed to your site, and works on a “per post basis” (more on this later). This feature is also known as “comment subscriptions.”

Double Opt-in Email Confirmation

Jetpack’s site subscription follows a double opt-in confirmation, i.e. users need to confirm their subscription by clicking on the activation link they receive via email.
This is also the case for comment subscriptions, wherein a double opt-in confirmation is sent for every post your visitor wants to subscribe to.
Jetpack has no limit on the number of subscribers and emails you send each time you publish a new post or someone signs up to a comment notification.
How to configure Jetpack email subscriptions in WordPress
At the beginning of this article, I mentioned that Jetpack Subscriptions is one of the easiest ways to set up an email marketing solution for your site. Let’s see if you feel the same way!
Step 1: The first thing you need to do is create a new WordPress.com account. If you already have one, open a new tab and log in to your account.
Step 2: Install and activate the Jetpack plugin on your WordPress site.

Step 3: Head over to your WordPress dashboard > Jetpack and click on “Set up Jetpack,” as shown in the screenshot above. This will connect Jetpack to your WordPress.com account.

Approve the connection and proceed to the next step. You’ll need to answer a few questions about your blog such as blog type, ownership, etc.

In the final step, you’ll be asked to subscribe to a paid Jetpack plan. Remember that Jetpack offers a lot more features such as free CDN, downtime monitoring, cloud backups and more. Click on “Start with free” to finish the set-up process.

Once the Jetpack connection is successful, you’ll be able to view your site stats and other settings in the WordPress.com dashboard.
It is important to note that after this step, your self-hosted WordPress site will now be available under “My Sites” in your WordPress.com dashboard. Jetpack gives you the ability to remotely manage your self-hosted WordPress site, directly from your WordPress dashboard. You can do things like update themes, plugins, add/remove posts/pages, moderate comments, view site stats and manage your site subscribers.
Step 4: Jetpack is now ready to send post notification emails to your site subscribers! All you need to do now is add a newsletter subscription form and publish a new post to see it in action.
Before getting to that, let’s look at how to enable comment subscriptions in Jetpack.
How to set up Jetpack comment notification emails in WordPress
Jetpack’s Subscriptionsfeature lets visitors subscribe to your blog post comments.
Unlike site subscriptions, comment subscriptions work on a “per post” basis. That means if a visitor comments and subscribes to one post, they will get comment notifications emails only for that post.
This “per post” feature has the distinct advantage of ensuring that people receive emails for only those posts in which they have left a comment.

You can follow these steps to enable the comment subscription feature in Jetpack:
- Login to your WordPress dashboard and go to Jetpack Settings Discussion tab.
- Scroll down to the Subscriptions module and enable it. This will replace your WordPress theme’s default contact form with the one from Jetpack.
- Next, enable the “subscribe to comments” feature.
- You can also optionally turn on the “subscribe to site” feature, to enable visitors to subscribe to your site (i.e. get new post emails) while commenting.
Once done, your site’s comment form will look something like this:

Note the two subscription options at the bottom-left corner of the contact form. They are unchecked by default, and the person posting the comment must check each item individually. This reduces unsolicited emails and dramatically increases the quality of your email subscribers.
Next, I’ll show you various ways to add Jetpack email signup forms to your WordPress site.
How to add a Jetpack Subscriptions signup form to WordPress
There are three ways in which you can add Jetpack’s email subscription form to your WordPress site:
- Via the comment form, which we’ve covered in the previous section.
- Using the Jetpack subscription widget.
- Via the Jetpack shortcode.
How to add a Jetpack Blog Subscriptions widget to WordPress
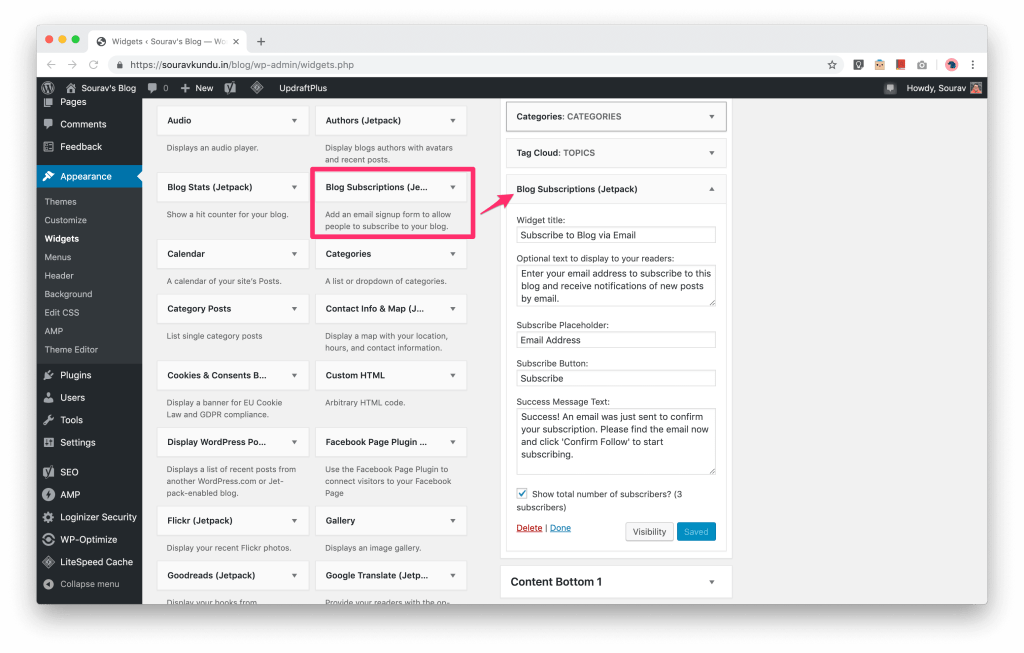
- Head over to your WordPress dashboard and go to Appearance > Widgets.
- Drag and drop the Blog Subscriptions widget to any available widgetized area in your WordPress theme. (I’ve chosen the sidebar in this tutorial)
- You can configure the placeholder text and other information within the Blog Subscriptions widget and click Save once done.
This is how the signup form looks in the Twenty Sixteen theme:

How to add a Jetpack email subscription form using shortcodes

In order to use Jetpack shortcodes, you must first enable shortcode execution from Jetpack settings:
- Visit Jetpack > Settings > Writing and scroll down to the Composing section.
- Enable the “Compose using shortcodes to embed media from popular sites” option.
You can use Jetpack shortcodes to add an email signup form in posts, pages or widgets — essentially anywhere on your WordPress site that supports shortcodes.
The default shortcode is [jetpack_subscription_form] which displays the predefined text in the subscription form. You can further customize the shortcode with the following additional options:
- title: Heading of the form. (“Want Instant Blog Updates?”)
- subscribe_text: Copy to persuade the reader to subscribe. (“Get instant emails when I publish a new article!”)
- subcribe_button: CTA copy (“Subscribe Now”)
Here’s the complete shortcode:
[jetpack_subscription_form title="Want Instant Blog Updates?" subscribe_text="Get instant emails when I publish a new article!" subscribe_button="Subscribe Now"]
Optionally, you can also omit a field by leaving the option blank, such as title = “”. This will remove the title field from being shown in the signup form.
How to manage your email subscribers in Jetpack
In this section, we’ll show you how to import and export your email subscribers that have signed up using Jetpack. The first thing to know is that you can manage your Jetpack email subscribers only via the WordPress.com dashboard.
How to export your Jetpack subscribers

Visit your WordPress.com dashboard and go to Manage > People and select the Email Followers tab. Here, you can export your existing list of subscribers and individually remove them from your list.
To export your subscribers, click on Download data as CSV. You can use this file to import your email subscribers to any other email marketing plugin, such as MailPoet.
How to import email subscribers in Jetpack

You can import your existing email subscribers, 10 at a time. On the People page, select the Invites tab and click on Invite, as shown in the screenshot above.

Enter the email addresses (maximum 10 at a time), and select Role as “Subscriber.” You can optionally enter a custom message. Once ready, click on Send invitations.

The invites will be sent, and the emails will be kept in the pending state. Only when someone clicks on the double opt-in email will they be confirmed as an Email Follower. You can also choose to re-send or revoke the pending invites.
That being said, we do have a problem…

Note that the invitation email’s subject line reads “NAME invited you to contribute to BLOG_NAME.” This can be misleading since you’re only trying to add the person as a subscriber. The message that you wrote in the invitation is put in the body of the email.
Invitees also need to have a WordPress.com account (or sign up for one) in order to follow your blog, which is certainly not ideal.
Subscriber preferences offered by Jetpack
One of the best things I like about Jetpack is its thoughtfully designed subscription preferences management dashboard for your email subscribers. This section discusses this feature.
Email subscribers can manage their subscription preferences via their own WordPress.com dashboard by clicking the link in the email footer.

Here, they can manage “new post” subscriptions for various sites and comment subscriptions for individual posts.
For post notification emails (i.e. site subscriptions), subscribers can choose the email delivery frequency ranging from immediate, daily, and weekly. This is especially helpful since as a sender, you do not have control over scheduling emails — Jetpack automatically sends them immediately after a post is published.
For instance, if you (the blog owner) have published three articles in a week, a subscriber who has set the email delivery frequency to weekly will get just one email containing all three posts.

The screenshot above is of the Comments tab in the Subscriber Management dashboard, which shows the list of individual posts the user is subscribed to for comment notification emails.

The Settings tab enables you to unsubscribe from all emails, change the email format (HTML or plain text), set the email delivery time, and even change the subscriber’s email address.
Limitations of Jetpack as a newsletter plugin
While Jetpack is a fantastic plugin to set up email subscriptions in your site, it comes with a few limitations:
- Only post notification emails: You can’t send newsletters, welcome emails, or drip campaigns with Jetpack. Post notification emails are sent only once, which means if you update a post, Jetpack won’t send emails.
- Email schedule and frequency: Jetpack sends post notification emails immediately after the post is published, preventing you from scheduling your emails.
- Email frequency: Only subscribers can manage the email delivery frequency from their subscription preferences dashboard, as discussed earlier.
- Zero design customization: The same blue email template is followed for everyone using Jetpack subscriptions. You cannot customize the post notification email to match your brand, in any way whatsoever.
- No open or click statistics: You don’t get vital email marketing statistics such as open and click rates.
- Closed ecosystem: Jetpack’s Subscription module is incompatible with all newsletter and lead generation plugins. You can only add subscribers via the official widget and shortcode.
- Importing subscribers is a pain: You can manually import only ten subscribers at a time – CSV import is not supported. Moreover, invitees must have a WordPress.com account in order to subscribe to your blog, which is a major roadblock.
- Cannot set “from” or “reply-to” address: A custom “from” or “reply-to” address creates an easy way for your subscribers to reach out to you. You cannot do that with Jetpack.
MailPoet: A free alternative to Jetpack Subscriptions
As your site’s content and traffic increases, you’ll quickly outgrow the feature set Jetpack’s Subscriptions feature offers. You’ll know you’ve outgrown Jetpack when you want to accomplish any of the following email marketing tasks:
- Send regular newsletters, and not just new post notifications
- Design your emails to match your website and brand
- See open and click rate stats for each email sent
- Enhanced marketing tools, like automated emails to welcome your new subscribers
- Importing/exporting — Unlike Jetpack, you can easily import and export subscribers with these services via copy-paste, CSV upload, and API.
MailPoet is a great alternative to Jetpack’s Subscriptions module. We’ve also compared Jetpack, Mailchimp and MailPoet thoroughly in the past to help you pick the newsletter plugin that best suits your requirements.
With MailPoet, this is what an email with the latest posts sent automatically to your subscribers can look like:

Steps to set up post notifications in MailPoet

Here’s how you can set up instant post notification emails for your subscribers, using MailPoet:
- Install and activate the MailPoet plugin.
- Go to WordPress dashboard > MailPoet > Emails page and select Latest Post Notifications.
- Select the campaign frequency in the next step. If you want to send email notifications as soon as your post is published, select Immediately. Else, try to schedule your emails according to your publishing calendar.
- Next, select a template (preferably Post Notifications template) from MailPoet’s 50+ newsletter template library.
- Use the Automatic Latest Content content block in MailPoet’s drag-and-drop email editor to design your post notification email.
- Once the email is ready, select the subscriber list, “from” and “reply-to” address, and schedule the campaign.
Wrapping up
Here’s a quick overview of what’s been covered in this article:
- Jetpack is one of the best free WordPress email subscription plugins, perfect for those new to WordPress and email marketing.
- You can send instant post notification emails (site subscription) and comment notification emails (comment subscriptions) with Jetpack.
- Site subscriptions work on a “per site” basis and comment subscriptions work on a “per post” basis. Enabling comment subscriptions replaces your theme’s default contact form with the one from Jetpack.
- Jetpack works only when you connect your (self-hosted) WordPress site to your WordPress.com account.
- You can add Jetpack subscription forms in your site using widgets and shortcodes. Integration with newsletter plugins isn’t supported.
- You can manage (import/export) your Jetpack subscribers only in the WordPress.com dashboard.
- Jetpack comes with limitations and as your site grows, you must upgrade to a proper email marketing solution such as MailPoet or Mailchimp.


I really do like the jetpack plugin. It’s free and easy to use but it does has the downfalls you mentioned in your posts. I’ll look into mailPoet for my next blog site. Seeing my open and click rates would be definitely help in how I craft my emails to send to subscribers.
Jetpack sure is a great plugin – I personally use it in my blog for downtime alerts.
Glad you’re considering MailPoet for your next site, Larry! Let us know if you need anything. :)
Cheers,
Sourav
Hello
Excellent article Thank you very much!
In the example you showed here (in the first photo) in order to read the rest of the post you need to click on “read more of this post”
In contrast, in my blog emails the entire post appears and you do not need to click and therefore you do not enter the site
how it is possible that the email sent will only show the opener and not the entire post
thank you very much
Rachel, are you using Jetpack for your emails or MailPoet?
Hi Sourav,
Great post, and very informative. I have switched from Jetpack to Mailchimp, but Jetpack is still sending emails. To disengage Jetpack, is it as simple as going to Jetpack>Settings>Discussion and turning off “Let visitors subscribe to new posts and comments via email”? To me that sounds like I’m not allowing new subscribers, but am I also turning off new post emails?
Hello,
This was very useful in embedding the Jetpack subscription form to my post. I used the code in conjunction with the “Advanced Ads” Plugin and it worked perfectly well. The Jetpack is now showing at the bottom of every post on my blog now.
Thank you