
Looking for a way to set up a paid newsletter subscription service so that you can charge users for access to your newsletter content?
This type of paid newsletter approach has gone mainstream with platforms like Patreon and Substack. But while those tools undoubtedly make it easy to create a paid newsletter, they don’t give you much flexibility and they’ll take a 10%+ cut from every dollar you make forever. That 10% can really add up over time, especially as your newsletter grows.
In this post, we’re going to show you a better way to create your own paid newsletter subscription using self-hosted WordPress.
You’ll not only be able to keep more of your hard-earned subscription revenue, but you’ll also have more ownership and flexibility in your platform, which opens up new opportunities that those other platforms can’t offer.
Here’s everything that we’ll cover in this big guide:
- Some real-world use cases of how you can use this type of paid newsletter functionality.
- An example of what you’ll be building in the tutorial.
- What you need to create a paid newsletter subscription service with WordPress.
- A detailed step-by-step guide on how to set up your paid newsletter.
Why create a paid newsletter subscription service?
In a nutshell, a paid newsletter helps you achieve the holy grail of making money on the internet – automatic recurring revenue.
Once you convince a subscriber to sign up one time, they become a recurring source of revenue every month for the life of their subscription.
As long as you keep releasing the same quality of content that convinced them to subscribe in the first place, you’re likely to maintain a large percentage of your subscribers going forward.
Now, you might be saying, “people aren’t willing to pay for subscriptions from creators – I’m not Netflix”. That thinking was pretty popular five years ago, but it’s been proven wrong in 2021.
You can now find tons of examples of successful creators monetizing their content with subscriptions. Let’s look at some…
Examples of successful paid newsletters
A classic example of a paid newsletter is Ben Thompson’s Stratechery, which charges $12 per month for access to premium content and has built a household name doing so.
Scott’s Cheap Flights follows the same model, sending the best cheap airfare deals to paying subscribers, while only giving free subscribers a limited taste.
Companies have also built huge businesses helping creators monetize with subscriptions. Take two popular examples:
- Patreon – check out Graphtreon to see some popular creators and what they’re earning.
- Substack – view some of the most successful newsletters here.
There are heaps of creators making serious money with subscriptions, all from individual subscriptions that usually cost around $3-$12 per month. There’s no reason why you can’t join them.
How much could you make with a paid newsletter?
The attraction of recurring revenue is that it builds up over time.
For example, let’s say you charge $5 per month for access and you get five new subscribers per month. Here’s how much you earn per month.
- Month 1: $25 per month
- Month 2: $50 per month
- …
- Month 6: $150 per month
- …
- Month 12: $300 per month
- …
- Month 24: $600 per month
- and so on
Of course, in the real world, you’d have some subscribers stop paying (called churn). But you’d also see your new subscriber counts start increasing as your newsletter grows.
By month six, you could be getting 15 new subscribers per month. And by month 12, you could be up to 40 new subscribers per month.
The key lesson here is this:
With automatic recurring revenue, even small increases in subscribers can grow to become a large source of revenue if you remain consistent in creating content.
Yes – it will certainly take time to grow a subscriber base. But once you have that base, you have consistent money coming in every single month, which is a pretty powerful concept.
What can you do with a paid newsletter subscription?
There are a lot of different types of content that you can monetize with a paid newsletter. Here are some ideas – but you can get creative and come up with your own use cases:
- Long-form content/journalism.
- Course content.
- Webinar access.
- Early access to a new feature/content.
- Exclusive content.
- Exclusive deals (e.g. Scott’s Cheap Flights).
Remember, you’re not only limited to the content that you can include in the newsletter itself.
For example, you could send an email to your paying subscribers that includes a special link to a webinar that’s only for them. This lets you get creative and go beyond just the standard long-form content model.
Here’s what you’ll be building in this tutorial
Now that you have some background, we’re going to start shifting into the “how to” portion of this post.
But before we get to the instructions, we want to give you a real example of the type of functionality that you’ll be able to set up and what the “flow” will be like for you and your users.
So – here’s an example from our actual test site, which we set up using the tools and instructions from the tutorial.
Experience for users
With the tutorial below, you can create two types of user experiences:
- Just a paid newsletter where you only publish content via email.
- A website/email hybrid where you publish paid content via both your blog and email. Visitors can consume content via either platform (or both).
Our example site is set up to demo the second approach, but you can also implement the first.
When a user lands on the site, they’ll be able to see the first paragraph of each premium blog post, but the full content will be locked behind a prompt to purchase a subscription. Or, visitors can subscribe directly from the sidebar or a dedicated subscription page:

You can also publish some content that’s fully available for free.
On the subscribe page, they’ll see a prompt to pay. If desired, you can offer multiple options, like a monthly rate and a discounted annual rate:

Clicking the option to sign up will prompt the user to check out* using your preferred payment gateway. You can use PayPal, Stripe, and lots of other options:

*In the tutorial, we’ll talk about some ways that you can simplify this if desired.
As soon as they pay, the visitor is now a subscriber, which means that they’ll be able to access the full text of the premium content and receive emails.
Your visitors will also be able to view and manage their subscription details from a dedicated area on your site:

Experience for admins (You)
On the admin side, you’ll be able to manage all of your subscribers from a simple dashboard:

Anyone who has an active subscription will automatically be on your paid newsletter list.
When you want to create an email, you can design the content using a visual drag-and-drop builder and/or insert the full text of a blog post:

You can then send the email to all paying subscribers with just a couple of clicks.
You’ll also have the option to publish the content on your website and restrict access to only paying subscribers.
What you need to create a paid newsletter subscription with WordPress
To create a paid newsletter subscription service with WordPress, you’ll only need two tools on top of your WordPress site.
1. MailPoet
First, you need MailPoet.
MailPoet is what handles all of the email parts of your service. It’s what will help you:
- Create emails to send to your subscribers – you can either use a simple text editor or create more unique emails via the visual, drag-and-drop editor.
- Reliably deliver emails to subscribers’ inboxes using the built-in email sending service.
- Segment your subscribers. For example, you could have one segment for all email subscribers (free and paid) and another for just paid subscribers so that you can offer multiple “tiers”.
Basically, if it has anything to do with email, MailPoet will handle it for you.
2. WooCommerce
While MailPoet can handle everything to do with “newsletter subscription”, the one thing it does not handle is the “paid” part of your newsletter subscription service.
To handle that, you need the free WooCommerce plugin, which is the most popular eCommerce plugin for WordPress.
However, you won’t be using it as a full-service eCommerce platform. Instead, you’ll just be using it to process payments and manage subscriptions.
You’ll also need at least one paid WooCommerce extension – maybe two depending on your desired setup.
To accept ongoing subscription payments, you’ll need the WooCommerce Subscriptions plugin, which costs $199.
With the plugin, you can charge monthly or yearly (or both – and let users choose). You can also incorporate elements like free trials, which are a useful marketing strategy.
If you also want to cross-publish your newsletter content on your blog/website and restrict access to that content for subscribers, you’ll need to add WooCommerce Memberships to the mix, which also costs $199.
Summary
To recap what we covered above, here’s what you need to create your paid newsletter service and what it will cost:
- MailPoet – required – free Free plan for 5,000 emails per month to up to 1,000 subscribers. Once your subscribers grow past that, suitable plans start at just €17 per month.
- WooCommerce – required – free.
- WooCommerce Subscriptions – required – $199.
- WooCommerce Memberships – optional – $199.
The key thing here is that there are no ongoing commissions on the money that you accept. Minus the flat fees that you pay for these tools, you get to keep every dollar from your subscribers*.
*You’ll still need to pay the “standard” ~3% credit card processing fee to a payment processor like Stripe. This is unavoidable if you want to accept credit card payments on the internet and you’ll need to pay it no matter what solution you use.
For comparison, Substack charges 10% and Patreon charges 5-12% of all your subscription revenue forever, which really adds up over time. Those numbers are excluding the payment processing fee, so you’ll actually be losing ~13% with Substack and ~8-15% with Patreon.
How to create a paid newsletter subscription service with WordPress
Now, let’s get into the step-by-step guide for how you can set up this functionality using WordPress and the tools that we’ve discussed above.
For this tutorial, we’ll only assume one thing – that you already have a working WordPress website.
If you’re not sure how to create a WordPress site, here’s the quick process:
- Purchase web hosting. Here are some WordPress web hosts that we recommend.
- Use your chosen web host’s WordPress installer to install the software. Most hosts make this pretty easy to find, but you can always reach out to their support if you need some help.
- Choose a WordPress theme to control the design of your site. You can always come back to this later once you set up your paid newsletter – so don’t stress too much.
Once you have your basic WordPress website up and running, here’s how to turn it into a paid newsletter subscription service.
1. Install and configure WooCommerce
To get started, go to Plugins → Add New. Search for and install/activate the free WooCommerce plugin.
Once you activate it, WooCommerce should automatically launch a setup wizard to configure some important basics for your store. Go through the steps to add some basic details – these choices don’t have any big implications, so don’t stress too much. Just answer the questions to the best of your ability.

When you get to the free features section, you can uncheck all of the boxes except for WooCommerce Payments, Jetpack, and MailPoet (the last of which you’ll set up later in the tutorial):

On the last step, WooCommerce will suggest some themes. If you already like your current WordPress theme, you can just continue with it.
Once you exit the wizard, you can go to WooCommerce → Settings → Payments to set up your payment processor. We recommend WooCommerce Payments. But you can use any gateway that supports subscription payments.
If you need any additional help with WooCommerce, we recommend consulting the support docs, like the getting started guide.
2. Set up WooCommerce Subscriptions
Now, it’s time to set up your subscription payment options.
To begin, make sure that you’ve purchased, installed, and activated the WooCommerce Subscriptions plugin.
Then, go to Products → Add New to create your subscription product. When a visitor purchases this “product”, it will give them access to your paid newsletter content (and paid website content, if applicable).
To get started, enter the basic product details. You can give it a title – e.g. “Paid Newsletter Subscription” – and enter a simple description to explain what people will get with their purchase.
Then, you’ll use the Product data box to set up details for your subscription. First, set the drop-down equal to Simple subscription.
Then, use the settings to configure:
- Price
- Billing duration (e.g. every month or every year).
- Duration (you’ll probably want to set this to Never expire)
- Free trial (optional – but you can set this up if desired)
For example, to set up a subscription that costs $5 per month, you’d configure it like so:

If you want to offer multiple payment terms, you could optionally change the product type to Variable subscription. For example, this would let you charge “$5 per month” OR “$50 per year”:

And that’s it! Now, when people purchase this “product”, they’ll automatically be subscribed to your newsletter.
3. Set up MailPoet
Next, it’s time to set up the email portion of your paid newsletter service using MailPoet.
You should’ve already installed MailPoet when you went through the WooCommerce setup wizard in Step #1 of this tutorial. If you haven’t installed it yet, no worries! You can also just install and activate the free MailPoet Starter plan.
When prompted to use MailPoet with WooCommerce, make sure to allow both options so that MailPoet can automatically add your paying subscribers to your email lists:

Now, the user flow will go something like this:
- A user visits your site.
- The user purchases the subscription product via WooCommerce.
- MailPoet automatically adds the user to your email list based on the email they entered at WooCommerce checkout.
4. Send emails to your subscribers
At this point, you’re ready to start sending newsletters to your paid subscribers.
There are two parts to this…
Create a segment for paying subscribers
First, you need to create a segment in MailPoet that only includes users with an active subscription. This will distinguish paid users from free users or users whose subscriptions have expired.
To create your segment, go to MailPoet → Lists and then click New Segment:

Give your segment a name – e.g. “Paying Subscribers”.
Then, under the Segment drop-down, find the WooCommerce Subscriptions section and choose has an active subscription. That will expand another drop-down – choose the subscription product that you created in Step #2 of this tutorial:

Then, Save your changes.
Send emails to that segment
Now, you can use MailPoet’s email builder to send an email that only goes to your segment that contains paying subscribers.
To create an email, go to MailPoet → Emails → New Email. Then, choose the option for Newsletter:

You can then choose one of the templates. For a newsletter, you’ll probably just want a simple text email or one of the blank templates

For the content of the email, you have two options:
- You can add the content directly to the email.
- If you’re cross-publishing content between your blog and email newsletter (which we’ll touch on in the next section), you can automatically insert the full text of the blog post in the email.
If you want to add the content directly, you can just click and type:
To insert a post’s content, add the posts widget from the sidebar and choose the post you want to display:
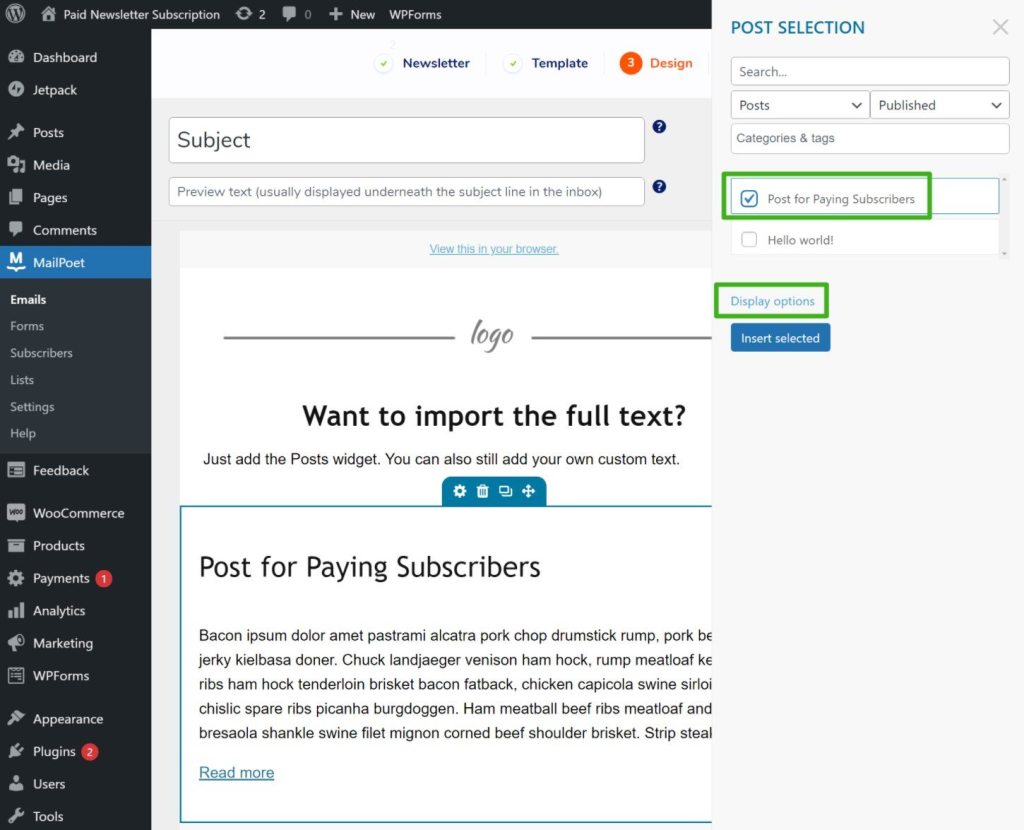
Then, click Display options and choose Full post to display the full text. Make sure to click Insert Selected at the button to add the post.
Even if you’re embedding the full content of a post, you can still include custom content. For example, you could write a custom introduction for your email subscribers followed by the full text of the blog post.
Once you’ve added the content, click Next. Then, enter the basic sender details. Under Lists, make sure to choose your “Paying Subscribers” segment. You can then either send the email right away or schedule it for the future:

And that’s it! You just created your very own paid newsletter subscription service.
Optional enhancements to your paid newsletter subscription service
In the section above, we showed you the bare minimum to set up a paid newsletter subscription service with WordPress.
Now, let’s run over a few useful tweaks/additions you might want to configure. These are 100% optional, but they can further enhance your site’s functionality.
Restrict access to premium content on your site
If you want to also restrict access to some/all of your website’s content, you’ll need to purchase, install, and activate the WooCommerce Memberships plugin.
Then, go to WooCommerce → Memberships → Membership Plans → Add Membership Plan:

Give it a name and set Grant access upon equal to product(s) purchase. Then, choose your Newsletter Subscription product that you created earlier in the tutorial.
Under Subscription-tied Membership length, make sure to select subscription length. This will tell the plugin to maintain a user’s membership as long as they have an active subscription:

Then, Publish your membership.
Now, when you want to publish a piece of content that’s only available to paying newsletter subscriptions, you can use the Memberships box in the content editor to create a rule so that only paying subscribers can see the content – other users will be prompted to sign up for a membership:

WooCommerce Memberships has lots of other useful settings that you might want to explore. For example, you could show partial excerpts, customize the restricted content message, automatically restrict entire categories of content, and more.
Offer both free and paid subscriptions with different content
A lot of paid newsletters use a freemium model where free subscribers get access to basic content and paid subscribers get access to premium content.
MailPoet makes this easy to set up. In addition to your paid subscriber segment, you can just create another list to house all subscribers:
- When you want to send free content, you just send it to the list of all subscribers.
- When you want to send premium content, you only send it to the paying subscribers segment.
To help grow your free subscriber list, MailPoet can also help you create email opt-in forms – just go to MailPoet → Forms → New Form to get started:

Simplify your checkout process
As we mentioned earlier, WooCommerce is primarily an eCommerce plugin, so the default checkout process still follows the normal eCommerce flow where users first add the subscription to their shopping carts and then check out.
For a paid newsletter subscription, you don’t really need a shopping cart, so you might want to adjust the checkout flow.
For a simple option, you could use the WooCommerce Direct Checkout plugin, which lets you skip the shopping cart page and send users straight to checkout after they click the button to subscribe.
Or, you can find other plugins that let you completely revamp the entire checkout process.
A good option is CartFlows, which would let you create a single landing page for your newsletter subscription. Visitors will be able to view details about the subscription and check out from just that page, which creates a more user-friendly experience.
Here’s an example of the type of integrated checkout you can create with CartFlows:

You can easily adapt this to a newsletter subscription without needing any code.
Create your WordPress paid newsletter today!
In 2021, we’ve seen the growth of paid newsletter subscriptions from solo creators or teams.
With WordPress, you can create your own paid newsletter subscription with more flexibility and without needing to pay an ongoing commission to another service.
You’ll keep all the money that your subscribers pay and you’ll retain the ability to add new features to your site, like launching an online course, selling products, creating a discussion forum, and more.
All you need is WooCommerce + WooCommerce Subscriptions to handle the “paid” part and MailPoet to handle the “email subscription” part.
Do you still have any questions about creating a paid newsletter subscription service with WordPress? Ask us in the comments!


This looks like the perfect solution that I’m looking for! When someone cancels their subscription, will it automatically remove them from the newsletter mailing list? Or do they have to be manually removed? Thanks!