
If you want to protect your sender domain (usually the same domain of your website) from spoofing attacks and improve your email deliverability, setting up an email authentication method such as DKIM is highly recommended.
Email spoofing is a common tactic used by fraudsters, in which they impersonate an email sent by a brand or person at a business. Spoofed emails can sometimes be used in phishing attacks, where they try to fool readers into giving away personal information (such as credit card details), by posing as a known legitimate business.
91% of cybersecurity attacks start with an email and a whopping 3-6million scam attempts happen daily, says research from Valimail, reported by Forbes. While spoofing attacks are common, there are fortunately ways in which you can better protect your email sender domain and prove that the emails MailPoet Sending Service, or any 3rd party service, delivers on your behalf are indeed authorized to be sent.
Adding DKIM authentication is one method, and MailPoet has just released an easy way of including DKIM records to your emails if you’re a MailPoet Sending Service user 🎉
In this post, I’ll be covering:
What is DKIM?
If you’re not familiar with email authentication methods, you might be thinking “D-what?!”. Do not fear – we’ve got you covered.
DKIM (DomainKeys Identified Mail) is a type of “digital signature” that confirms to the email recipient that an email is genuine and from the listed sender.
We like to think of it as a digital permission slip. By adding DKIM records to your sender domain in MailPoet (or any other email marketing provider), you’re telling your subscribers’ mail server that you have given us permission to send emails from your domain.
These digital signatures are generally not made visible to the email recipient and are instead included in the email infrastructure. So no need to worry about them getting in the way of your email content!
What about SPF and DMARC?
You might’ve also heard the terms SPF and DMARC banded around in conversations about DKIM.
SPF is another email authentication method and works in a similar way to DKIM. Instead of a digital signature, SPF uses IP addresses to authenticate your emails. Via your DNS records, you specify the IP addresses of the authorized senders associated with your domain. Your email recipient’s mail server will then check your sent email against this list, and if it isn’t a match, it’ll get marked as spam.
The use of SPF or DKIM enables DMARC. If you want to use DMARC, you first need to set up SPF or DKIM. This allows the domain owner to specify how the recipient should process the email when it is not authenticated by SPF or DKIM.
So if a fraudster sends an email on your behalf and you have SPF/DKIM and DMARC set up, you can instruct the recipient to outright reject the email, mark it as spam, or not suggest anything at all. Having SPF/DKIM is necessary to authenticate your own emails.
Do I need to set up DKIM?
Some email marketing service providers require you to set up DKIM in order to use their software and successfully send emails.
If you use the MailPoet Sending Service, this has never been (and still isn’t) a mandatory requirement. Our stringent account approval process has enabled us to retain a high sender reputation, which minimizes any email deliverability issues for our users. Put simply, we’ve never really needed our users to do this.
“So why are you recommending we start doing this now?” I hear you ask. As fraudsters get more advanced in their tactics, the email marketing industry as a whole is now far more security-focused.
We’ve already noticed email service providers are adopting stricter mail delivery processes in order to clamp down on fraudulent behavior. Microsoft Outlook, for example, has been classing more and more emails without an email authentication method present as spam. And we suspect it won’t be long before others follow suit.
We want to make sure your emails have the highest chance of delivery now and in the future. Setting up DKIM can help do this, as well as protect your business from being imitated by fraudsters. Plus the setup process is quick and easy. What’s not to like?
How you set up DKIM will depend on the sending service provider you use. But if you’re a MailPoet Sending Service customer, we’ve just added an easy way to set up DKIM for your sending domain 🎉
How to set up DKIM for your Sender Domain in MailPoet
Please note that the following DKIM setup instructions are only applicable to MailPoet users whose sending method is the MailPoet Sending Service. If you use a third-party sending method (such as SendGrid or Mailgun) and want to set up DKIM, you will need to follow instructions given by your sending provider.
Setting up DKIM authentication should be a pain-free process that only takes 15 minutes!
You’ll first need to log in to your MailPoet account at account.mailpoet.com.
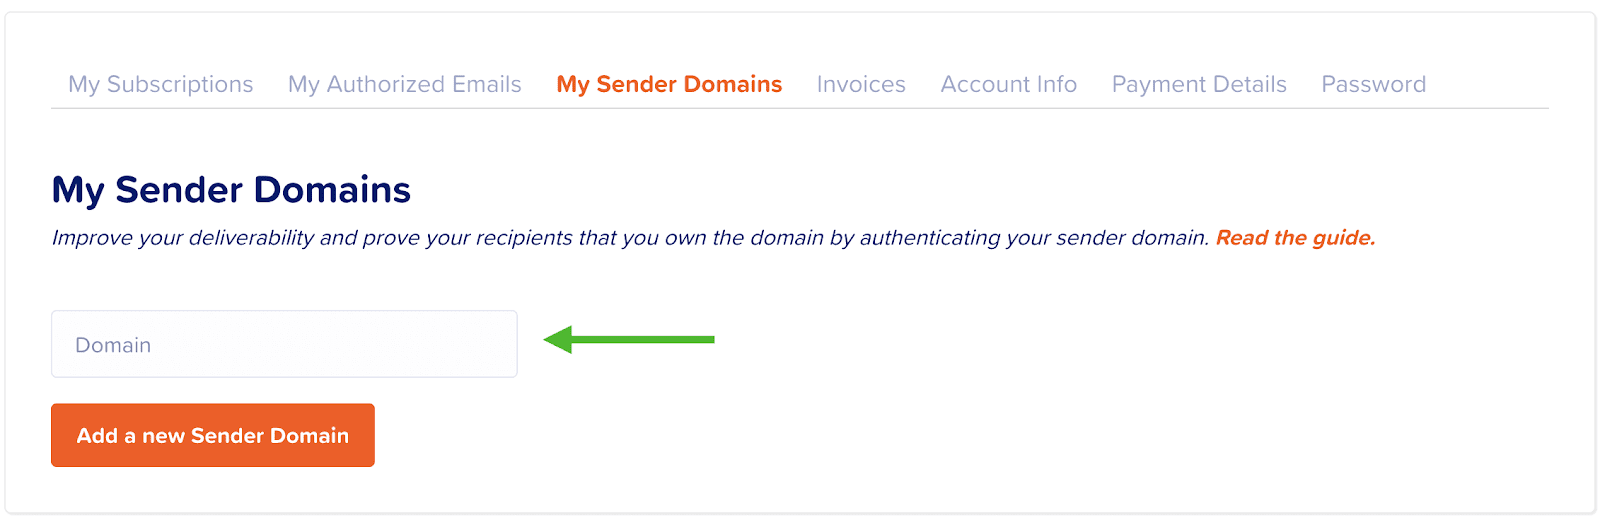
Then head to the ‘My Sender Domains’ tab in the account interface, in order to add your sender domain. A sender domain is the domain you are using on the FROM address of your emails. This is usually the same domain as your website. Let’s say you’re sending emails as laura@yogaclasses.com. In this case, your sender domain is “yogaclasses.com”.
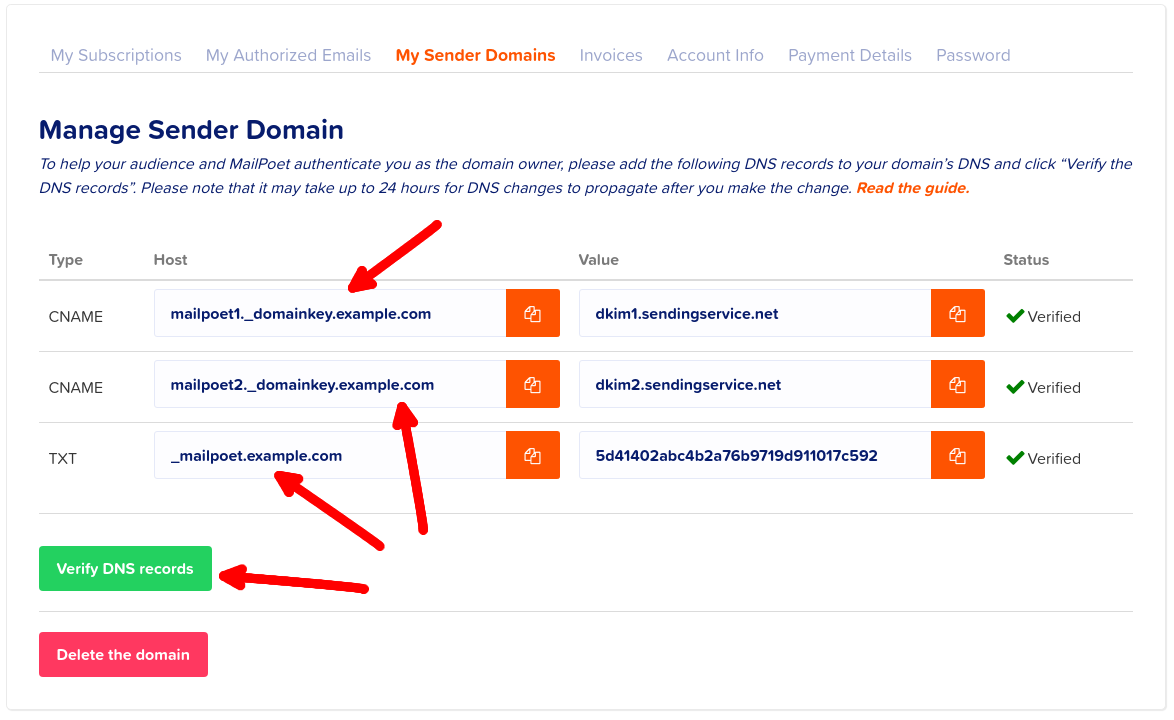
This will then produce three DNS records which you’ll need to add to your domain’s DNS server. Your DNS provider is usually the same organization as the one you purchased your domain name from originally (e.g. GoDaddy, NameCheap etc), or your hosting company.
Not sure how to do this? Your hosting or domain name provider will be able to help you out here. It’s not as complicated as it sounds, and they’re likely to have already published a guide on how to do this. For example, GoDaddy has published these instructions and NameCheap has shared this guide.
Once you’ve added the three DNS records to your DNS server, click the ‘Verify DNS records’ button and you’ll see the status for each will change to ‘Verified’.
And that’s it! You can now sit back, relax, and enjoy better deliverability and protection from pesky email fraudsters.
DKIM not working? Here are some common problems
Setting up DKIM should be a quick and easy process, but unfortunately, sometimes problems do arise.
If your records are not appearing as verified, please double check the following:
- The record types, names, and values in your DNS manager need to match the values in the MailPoet interface exactly. Please make sure you check this carefully, otherwise, verification cannot work.
- If you’ve just added the records, please try waiting 5-10 minutes and before clicking “Verify DNS Records” again. DNS changes can sometimes take up to 24 hours to generate, but normally you’ll see them within 5-30 minutes.
- Some DNS providers create DNS records with a duplicate of the domain name, so please double-check the DNS record name. This can cause “mailpoet1._domainkey.yourdomain.com” to be incorrectly created as “mailpoet1._domainkey.yourdomain.com.yourdomain.com“. If this is the case, please removed your domain name from the record’s name, leaving it as “mailpoet1._domainkey“, “mailpoet2._domainkey” and “_mailpoet“.
- If Cloudflare is your DNS provider, make sure you switch from “Proxied” to “DNS only” proxy status for both of the CNAME records.

Not yet using the MailPoet Sending Service? It’s free to use (up to 5,000 emails per month) if you have less than 1,000 subscribers, with paid plans starting at just €7/month. Download now, or find out more about what’s included in MailPoet.


Very cool!
Does that mean that my emails will end up in Inboxes more likely than before? Is this another layer of not getting in to SPAM protection?
Installation was super easy and took me 2 Minutes.
Thanks for your great product and talk soon!
Cheers from sunny Hamburg:
Keno
Hey Keno,
Glad to hear you like it :)
That’s right! Some email inbox providers (Outlook in particular!) are paying closer attention to whether emails have an authentication method present or not. If you’ve experienced deliverability issues in the past, there’s a good chance having DKIM set up will help improve this.
There are obviously a lot of other factors that are taken into consideration when an email provider determines what’s spam and what’s a legitimate email, so adding DKIM isn’t necessarily a magic fix-all solution. But it certainly helps :)
Laura
Buen dia
Me gustaria configurar mailpoet en mi pagina web pero no encuentro personal capacitado para poder realizarlo. Ustedes conocen personal que sepa configurar al 100 % esta aplicacion.? ademas tengo otra pregunta mi pagina esta funcionando con un plugin de Alidropship que es la version aliexpress de woo-commerce.. Esta esta ultima compatible con mailpoet…? si me responden les estare altamente agradecido.
Are there extra steps if trying to set this up while using CloudFlare on a domain, as many of the DNS records get passed through them first?
Hi there,
We’ve provided some information on Cloudflare at the very end of this post :) You’ll need to make sure you switch from “Proxied” to “DNS only” proxy status for both of the CNAME records (scroll up to the blog post for an accompanying screenshot).
If you have any other concerns about how DKIM set up works with Cloudlfare, we highly recommend reaching out to them directly. They’ll have more information on how to add these records.
Thanks,
Laura
Oh my gosh, it was right there in #4 and I missed it! Doh!
Thanks for the info and followup!
Thanks so much for looking into this. It was super annoying having emails bounce from Outlook etc.
This was a very easy procedure to go through.